Standardising your TV mounting means applying consistent hardware, height, and cable management practices across every installation in your home. This standardize unit tv mounting guide covers the full process: VESA pattern matching, optimal TV mount height calculations, wall structure requirements, and multi-unit TV mounting coordination. Done correctly, a standardised approach produces a safer installation, a better viewing angle, and a cleaner finish that looks professionally done. Whether you are a homeowner setting up a new living room or a renter mounting a single screen, these TV mounting standards apply directly to your situation.
Does your TV mount match VESA standards and weight requirements?
VESA compatibility is the starting point for every safe TV installation. The Video Electronics Standards Association (VESA) defines a grid of bolt holes on the back of your TV, measured in millimetres, such as 200x200mm or 400x400mm. Your wall mount must match that exact pattern. A mismatched pattern forces you to improvise with hardware that was never designed for the load, which is a safety risk from day one.
Weight rating is equally non-negotiable. Mounts must exceed your TV’s weight by at least 1.5 times. A 20 kg TV requires a mount rated for at least 30 kg. That safety margin accounts for vibration, accidental bumps, and long-term hardware fatigue.
Screw length is a detail many homeowners overlook. Mounting bolts that are too long can penetrate the VESA holes and damage the internal screen panel. Always use the screw lengths specified in your TV’s manual or the mount’s hardware kit.
Key checks before you drill:
- Measure your TV’s VESA pattern by finding the four bolt holes on the back and measuring the horizontal and vertical distance between them in millimetres.
- Confirm the mount’s weight rating is at least 1.5 times your TV’s weight.
- Use only the screws supplied with the mount or those specified in the TV manual.
- Check that the mount’s arm depth does not pull the TV away from the wall at an angle you did not intend.
Pro Tip: Write your TV’s VESA pattern and weight on a sticky note before you go to the hardware store. It takes 30 seconds and prevents a wasted trip.
What is the optimal TV mount height for your room?
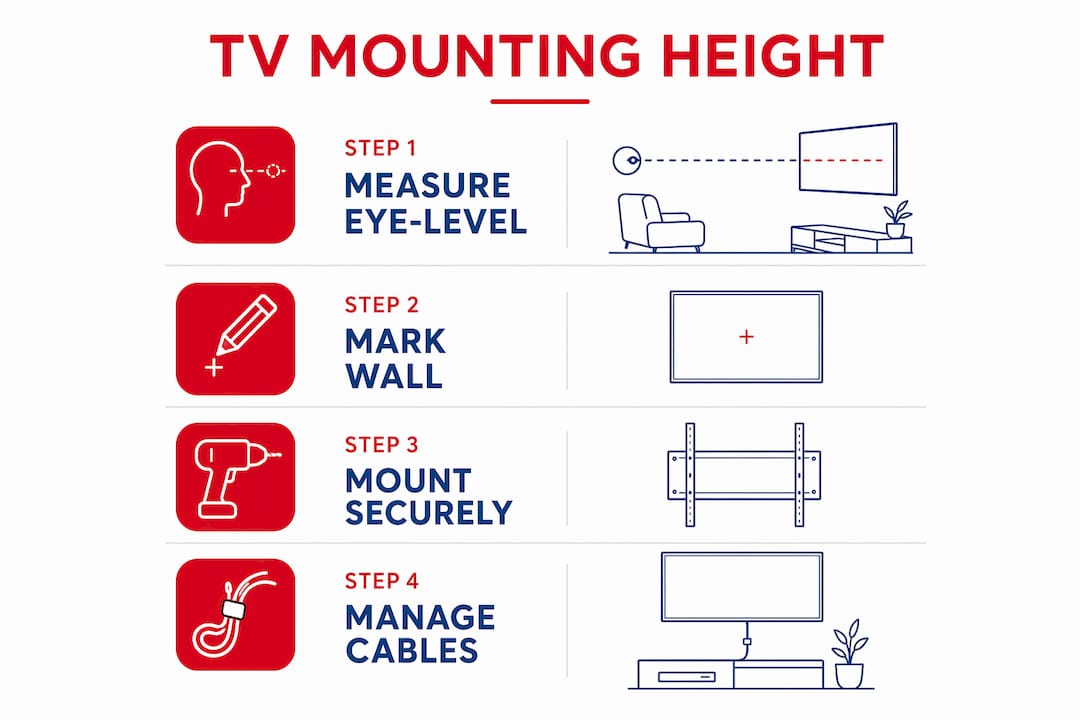
Height is the single most common mistake in TV mounting instructions. Most people mount their TV too high, then spend every evening tilting their head upward. The correct target is to place the centre of the screen at your seated eye level.
Seated eye level sits between 38 and 44 inches from the floor for most adults in a standard living room chair or sofa. That means the centre of your TV should land in that same range. For a 55-inch TV, the screen centre sits roughly 27.5 inches above the bottom edge of the TV. So the bottom of the TV should be mounted at approximately 10 to 17 inches from the floor, which is lower than most people expect.
| Room type | Recommended screen centre height | Notes |
|---|---|---|
| Living room | 38–44 inches from floor | Based on seated eye level |
| Bedroom | 52–60 inches from floor | Viewing from a reclined position |
| Kitchen | 54–60 inches from floor | Standing or bar-stool viewing |
| Home office | 40–46 inches from floor | Desk chair seated position |
Mounting above a fireplace is a popular choice but creates a real ergonomic problem. Neck angles over 15 degrees cause strain during extended viewing. If you must mount above a fireplace, use a tilting mount angled 0–15 degrees downward to bring the viewing angle closer to eye level.
Viewing distance also affects how height feels. A 55-inch TV sits ideally 7 to 11 feet from your seating position. At that distance, a screen centre at 42 inches feels natural. At a shorter distance, even a small height error becomes noticeable.
Pro Tip: Tape a piece of paper to the wall at your planned screen-centre height and sit in your usual viewing spot for five minutes before drilling. Your neck will tell you immediately if the height is wrong.
How do you secure a TV mount to different wall types?
Wall structure determines whether your mount holds safely for years or fails unexpectedly. The rule is straightforward: a fixed or full-motion mount must anchor into at least two structural wall studs. Drywall alone cannot support the weight of a TV and mount combined.
Wood studs are the most common anchor point in Canadian homes. Standard spacing is 16 inches on centre, but stud spacing is not always 16 inches. Always verify with a stud finder rather than assuming. Mark both edges of each stud to find its true centre before drilling pilot holes.
Metal studs, common in condos and newer builds, require different hardware. Standard wood screws will not grip metal studs reliably. Use self-tapping metal screws or toggle bolts rated for the load. Masonry and concrete walls need masonry anchors or concrete screws, and a hammer drill is required to set them properly.
Drywall anchors marketed as “heavy duty” are not a substitute for stud mounting. Most drywall anchors are rated for picture frames and shelf brackets, not for the dynamic load of a wall-mounted TV. A TV that pulls free from drywall anchors can cause serious injury and significant wall damage. Always anchor into structure.
- Use a quality stud finder and verify the result by driving a small nail before committing to a pilot hole.
- For metal studs, use toggle bolts with a pull-out rating that exceeds your mount’s weight requirement.
- For masonry, use sleeve anchors or wedge anchors, not plastic expansion plugs.
- Full-motion mounts add leverage to the wall, so they demand even stronger wall integrity than fixed mounts.
How should you plan cable management before mounting?
Cable management planned before drilling saves hours of frustration after the TV is on the wall. Once the mount is tightened and the TV is up, accessing ports and rerouting cables becomes much harder. The time to plan is before the first hole is drilled.
Start by measuring the cable runs from each device to the TV. Add 20% extra length to account for routing around corners and through conduit. Short cables pulled tight across a wall look messy and can stress the ports on your TV.
Running cables inside the wall is the cleanest solution, but fire blocks inside walls can obstruct cable runs. A fire block is a horizontal piece of framing installed between studs to slow the spread of fire. You will not know it is there until your fish tape stops moving. Surface-mounted cable channels are a practical alternative that avoids this problem entirely and is renter-friendly since they do not require drywall modifications.
Key cable management steps:
- Identify every device that will connect to the TV and note the cable type and length needed.
- Decide between in-wall routing and surface cable channels before drilling any holes.
- Test that all ports on the TV are accessible with the mount in its final position before fully tightening the mount bolts.
- Leave enough cable slack at the TV end so you can tilt or swivel the screen without pulling connections loose.
Pixlcanada technicians consistently flag port accessibility as the step most homeowners skip. Testing it before final tightening takes two minutes and prevents a full remount later.
How does multi-unit TV mounting differ from a single installation?
Multi-unit TV mounting, the industry term for installing two or more TVs in a coordinated array or side-by-side configuration, introduces complexity that a single-unit install does not have. Visual consistency becomes a shared standard rather than a personal preference. If one TV sits 2 inches higher than the next, the difference is immediately obvious and difficult to correct after the fact.
A multi-unit TV mounting coordination guide starts with a single reference height. Choose your screen-centre height based on the primary viewing position, then apply that exact measurement to every unit in the array. Use a laser level to transfer the height mark across the wall rather than measuring each unit independently, since tape measure errors compound across multiple installations.
Steps for a consistent multi-unit installation:
- Establish one reference height for all screen centres and mark it with a laser level across the full wall span.
- Confirm that every mount in the array meets or exceeds the 1.5x weight safety standard for its specific TV model.
- Map all cable routes before mounting any unit, since power and signal cables for multiple TVs must share wall space and conduit without crossing or creating a tangle behind the screens.
- Use the same mount model across all units where possible. Mixed mount depths create uneven screen-to-wall distances that are visible from the side.
- For very large TVs of 82 inches or larger, a minimum of four people is recommended for the lift to avoid mechanical stress on the mount and injury risk.
Why multi-unit TV installation differs from a single-unit job comes down to scale and coordination. A single error in height or cable routing multiplies across every screen in the array. Planning time increases proportionally, and so does the value of getting it right the first time.
Key takeaways
Standardising TV mounting requires matching VESA patterns, anchoring into structural studs, setting the screen centre at seated eye level (38–44 inches), and planning cable routes before drilling.
| Point | Details |
|---|---|
| VESA and weight matching | Confirm the exact VESA pattern in mm and use a mount rated at least 1.5x your TV’s weight. |
| Optimal screen height | Place the screen centre at 38–44 inches from the floor for standard living room seating. |
| Structural anchoring | Always anchor into at least two wall studs; never rely on drywall alone for TV weight. |
| Cable planning first | Plan and measure all cable routes before drilling to avoid fire block surprises and port access issues. |
| Multi-unit consistency | Use a laser level and a single reference height to keep all screens aligned in multi-TV installations. |
What I have learned from mounting TVs the hard way
The most common mistake I see is height. Homeowners follow the template height that comes with the mount packaging, which often targets 60 inches to the screen centre. That measurement suits someone standing in a showroom, not someone sitting on a sofa. The result is neck strain that builds slowly over weeks until it becomes a real problem.
The second lesson is stud verification. A stud finder gives you a starting point, not a guarantee. I always drive a small finish nail at the marked location before committing to a lag bolt. It takes 10 seconds and has saved me from drilling into a pipe chase more than once.
Cable management is where the best-laid plans fall apart. Running cables inside the wall looks great until you hit a fire block at the halfway point. Surface cable channels are not a compromise. Done neatly, they are nearly invisible and far easier to modify when you add a new device later.
If you are unsure about your wall type, your stud locations, or how to handle a multi-unit layout, a professional installation is the right call. The cost of a remount after a failed DIY attempt almost always exceeds the cost of professional TV mounting from the start.
— Pixlcanada
Pixlcanada’s professional TV mounting service across Canada
Pixlcanada brings trained technicians to your home to handle every step of a safe, standard-compliant TV installation, from VESA verification and stud location to cable management and final height adjustment.

The team serves homeowners and renters across Hamilton, Calgary, London Ontario, Victoria BC, Toronto, Vancouver, and more. Every installation follows the same safety standards covered in this guide, and every technician arrives prepared for wood studs, metal studs, and masonry walls. Pixlcanada holds numerous 5-star reviews for prompt, thorough service that leaves your space looking clean and your TV mounted correctly the first time. Book your installation through TV mounting in Calgary, Hamilton, or London Ontario to get started.
FAQ
What is the correct VESA pattern for my TV?
The VESA pattern is the distance in millimetres between the four bolt holes on the back of your TV, measured horizontally and vertically. Check your TV’s manual or measure the holes directly to find the exact pattern before purchasing a mount.
How high should I mount my TV in a living room?
Place the screen centre at 38–44 inches from the floor to match seated eye level. This is lower than most people expect and significantly reduces neck strain during long viewing sessions.
Can I mount a TV on drywall without hitting a stud?
No. Drywall alone cannot safely support a mounted TV. You must anchor into at least two structural wall studs, or use toggle bolts rated for the full load when mounting into metal studs or masonry.
Why does multi-unit TV installation require extra planning?
Multi-unit installations require a shared reference height, coordinated cable routes, and consistent mount models across all units. A single height error or cable conflict multiplies across every screen, making upfront planning far more critical than in a single-unit install.
What should I do if cables cannot run inside my wall?
Use surface-mounted cable channels. Fire blocks inside walls frequently obstruct in-wall cable runs, and surface channels are a clean, renter-friendly alternative that requires no drywall modification.
Recommended
- TV Mounting Toronto | Trusted 5-Star Service | Pixl Canada
- TV Mounting Calgary | Trusted 5-Star Service | Pixl Canada
- TV Mounting Edmonton | Trusted 5-Star Service | Pixl Canada
- TV Mounting Vancouver | Trusted 5-Star Service | Pixl Canada